Saturday, July 31, 2010

July, where did it go?

The weather outside surely lets you know that we are in the middle of summer.  We have been trying to get out to Colorado to our cabin for several weeks now.  The cool temperatures that we find at 10,000 feet is quite refreshing after you have experienced all the heat that we have here.  We potentially will head out there this week... we shall see if we make it this time.

It's been a while since I posted here, but sometimes things get busy, and before you know it a couple weeks have gone by.  We had company with us on our last Friday "lunch out day".  We have friends that had heard about the Huisache Grill in New Braunfels, but they had never been there.  The atmosphere and food is great, so any excuse to go back was welcome.  This picture is the garden path that leads to the back entrance to Huisache.

I have finished my first I-Spy quilt, but that was more than a week ago, so I thought it was time to put something new out there for those who might visit now and then to see if anything new is going on.  I bought the Farmer's Wife Sampler Quilt book and have started at block one and I am working my way through.  I already have 15 done... that is 15 that count as real blocks.  I made one using the wrong size HST so I had to add several more to make it come out to the right size.  I actually like it more than the real one.  The other block is from the book Sylvia's Bridal Sampler.  All of the blocks are the same size, and I am not going to enter any competition with it, so I am going to forge ahead and keep the strays that wander in.


I'm using all scrap fabric... somehow at this rate I can't see my stash going down very quickly.  I'm not being fussy about the colors, just trying to stay away from "too bright".  The two on the left are the orphans.

I will likely not have a new post here for a couple weeks... the connection at the cabin is super slow at best. Have a good week, and stay cool.


Sunday, July 18, 2010

I Spy anyone?

Not so long ago I had not seen an I Spy quilt.  My grandson has a game where you search for items, but it is in a box and has several cards with different sets of items.  You have to draw cards and then find the item on the picture card.  I was doing some surfing on quilting and sewing sites and I found an I Spy quilt quite by accident.  I thought it would be a really neat project to make one of these quilts.  I started looking for fabric with little objects in mind.  I had my friends looking through their stash.  Then one day, again surfing, I found an I Spy Swap.  If I got on the list before it filled up I could buy 10 pieces of fabric (or find it in my stash) and fussy cut 20 pieces from each piece and end up with 200 4" squares that I send to the address from the website, and I would receive by return mail 200 different 4" pieces.  How cool is that?

About two days ago I received my pack of 200 different squares, and what a selection.  I had already bookmarked the site so I could have a plan for my first I Spy quilt.  The first thing I did was to pick out 88 from the bunch that might work for my grandson.  I wasn't too fussy with my picks, just didn't choose things that were too girly.

 I put them up on my design wall to get a better picture.  I decided I wasn't going to get too picky with the positioning... I could drive myself crazy.  After I had them kind of set up, I had to turn them to orient them correctly so I wouldn't be picking them off the board and have to remember to turn them before I stitched them together.  My design wall is wider than it is high. The original pattern used white sashing with blue. The inspiration and pattern, and swap came from a neat web blog page, Obsessively Stitching  I thought that white would not be a good choice for a little boy, so I looked through my stash and came up with my red theme.  I think it was a great choice.  The pattern is based on a disappearing nine patch.

 
I have not even thought about what I will do for quilting on it, nor have I considered the backing or binding.  I do know that I want to put a strip of 4" squares on the backside, but not sure just how I will do it.

So if you have not seen an I Spy Quilt before, I will have to post a new image when I have it totally done.  I was just impressed that I got this far already.  After I had it all pieced together, I sat down in my chair with a pencil and paper and tried to see how many items I could list.  There are 88 squares, and I think I have 345 items that I came up with.  I think I will have to include the list I came up with for the Mom, but she will have to make the decision on how she will use it.

Just another fun project I thought you might enjoy.


Friday, July 16, 2010

The right size pillow form

 Yesterday I decided to make a pillow that was featured on ModaBakeshop.  I used fabric I had on hand... I even had some linen and the fusible fleece, right down to the buttons and rick rack.  I think it turned out pretty nice, but I ran into a problem when I tried to find the correct size pillow form.  I thought it would be a normal size, but I was mistaken.  Most pillow forms that I found were square sizes or rectangles nowhere near what I needed.  My husband was with me and he suggested that I buy stuffing and create a pillow the correct size.  I remembered that I had bought a couple pillows at IKEA when I was there a few months ago.  They have all the air squeezed out so they store pretty small.  I needed a pillow form that was 12" by 20" and this IKEA pillow was 20" by 26".  I sewed a double seam down the middle and cut between the lines of stitching, then I pushed the seam inside itself to make it like a French seam.  When it was done I had a perfect 12" by 20" pillow form.  Stash isn't just fabric, it is also stuff to go with the fabric.


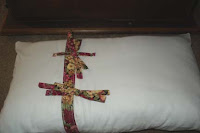
This is a closer picture of the end of the pillow and the back.  It is a really pretty pillow.  One that would be pretty on your bed or on your sofa as an accent.  I also made a quilted binder cover, again from fabric I had on hand.  I really would have saved soooo much time picking out the fabric if I had bought a jelly roll or honey bun from Moda, but these were practice pieces.
 

I tried the new technique I learned from an episode on TheQuiltShow where Ricky Tims demonstrated a Binding Miter Tool.  The binding goes on pretty slick using this technique.  Of course I had watched it a few weeks ago, not thinking I would need it right away, then when I wanted to add a binding, I couldn't remember which episode, so I had to request assistance from the Forum on TheQuiltShow.  They came to my rescue and I found it on the Series #3 DVD, espisode #310.  It is a little ruler/tool and you can find it at Animas Quilts.

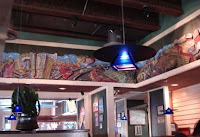
Last week I thought I would do something different because I only took one picture at the restaurant that we ate at, and I thought it was pretty unique to that restaurant.  Having people guess turned out not to be a good idea.  The restaurant last week was Red Robin.  I am quite sure that I saw a carousel horse at the one I went to up in Ohio.  The Red Robin is no longer in Columbus, Ohio so I can't go back there to check.  This week we didn't go to a new place, but it is one of the ones we enjoy going back to because we have a favorite pick on the menu.

  
Chilis is close and the food is good.  It even has quilt inspiration built right into the tabletop.  I am not sure that I will tackle a quilt with these blocks anytime soon, but they would sure make a neat quilt. 

I'm really enjoying my new Juki F600.  The machine sews beautifully and I can control the speed down to one stitch at a time.  I have put it through quite a spurt of production in its first week at my house, and it is scoring high on my list of expectations.

Have a nice weekend.


Friday, July 9, 2010

Another great Friday and a Giveaway


As many already know, Fridays are special around here.  There are exceptions, but as a rule we make Fridays special by going to lunch somewhere special, or doing something fun, and quite often both.  Today we didn't have anything special planned but we went someplace different for lunch.

I want to start something new here.  I have not done a giveaway before, but I will send a quilt pattern for the Yellow Brick Road to the first person who can identify which national chain restaurant this picture was taken at today.
We had a very nice lunch and it is a restaurant that we will do again.  I had been to one of these restaurants before, but my husband had not.
If you want to try for the right answer, send me a comment.


I have been working on a kitty wall hanging.  I think I have decided that maybe I will look for some nice simple kitty blocks that I can use to create an additional border(s) on this quilt to make it at least large enough to use as a lap quilt.  Right now I could just add the backing and start quilting, but I think I will put a hold on that, at least until I determine if I can find something for an additional border.

I mentioned yesterday that I bought a new Juki F600.  I thought I'd include a picture here.  It is still very new, and it takes time to figure out all that a new machine will do, but I think I am really going to be very happy with this one.

When we got home this afternoon, I wanted to resolve the issue I have with the chair I use when I am sitting at my sewing machine.  I previously had my two sewing machines that I use the most set up in my sewing room, and I moved the one I use more to the left side because the comfortable office chair has a high back and it would bump the ironing board every time I got up.  I have an older office chair that I gave to my husband that I really liked alot, but the seat cushion was worn and threadbare.  He took it out to use at his shop desk and bought a new one for me.  The new one is quite comfortable, but it has a high back.  When I set up my new Juki F600, I did not want to displace the other Juki 98Q, so that would mean I could not use the comfortable new chair.  The old chair that got moved out to the shop was very comfortable, and had a low back that missed the ironing board, but it was really ugly.  We looked at chairs today, but most have high backs.  I decided I would revamp the old chair and give the new comfortable chair to my husband.


My first step in this reconstruction was to secure the foam that was exposed in the cushion.  I didn't want the fibers from the old seat cover rolling back under the new cover, so I tucked a piece of fabric under the old cover and tack stitched around all the edges.  I then took a piece of upholstery fabric I had and fashioned the seat cover using a double layer of fabric and I made piping to go around the edge, and a drawstring to tighten the bottom edge and to secure it at the back.

 
I think it turned out pretty nice, and now I have my old familiar, comfortable chair back... with a new look.  Have a great weekend.


Thursday, July 8, 2010

It's a basket... or a bowl

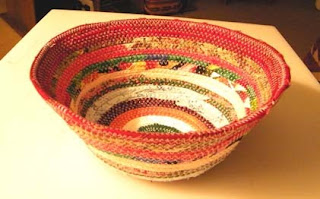
Last quilt show I went to I saw a sample of the technique to create a bowl from strips of fabric wrapped around rope.  These baskets/bowls are based on the technique described in the book "It's a Wrap".  There was also a demonstration on The Quilt Show a couple weeks ago.  Earlier this evening I sat down with a bunch of strips from my stash and the rope that I bought last week and I made this bowl.  It was fun, and quite easy.  I thought I might have an issue getting the sides to turn up, but it started turning fine when I wanted it to.  I finished piecing the log cabin blocks I was making for a kitty quilt that used 1 1/4" strips, so I had alot of fabric strips already cut and waiting for a new project.  This one was strictly a practice item, but I think it turned out pretty neat.
It's pretty versatile, I bent the edge over and the basket now had a lip, then I turned just one edge over and depending what I was going to put in it, that could look cool.

I made the decision about 10 days ago to sell my Singer XL-1000 on eBay to help offset the cost of the new sewing machine I wanted to buy.  The auction ended last Saturday and I did get it sold.  Not for what I would have liked, but as much as I thought I needed to considering it is almost 10 years old.  

The new machine that I bought is a Juki F600.  First I have to tell you that I have a Juki 98Q that I absolutely love for my piecing, but it is strictly a straight stitch.  I wanted more stitches that were more focused on quilting, so I decided it was time to let go of my XL-1000 that was meant to be an embroidery machine and I hadn't used the embroidery feature for several years, since I purchased my commercial embroidery machine.

Now back to the F600, it arrived on Tuesday.  I have done alot of practice stitches already, just to see some of the 225 built-in stitches, and I completed the piecing of the log cabin blocks for my kitty quilt.  This evening I stitched the bowl.  This is an awesome machine.  One of the more important features that my new machine had to have is a knee lift for the presser foot.  I know people who have this feature and do not use it.  I want to tell you I really don't like sitting at a machine that does not have this feature.  My husband sat and watched me for a short time yesterday and he noticed how much I used the knee lifter and how beneficial it was to what I was doing. He said, now I know why that was so important for you.

Not sure what is on the agenda for tomorrow.  It is Friday and our date day, so with no plan in place, we will have another adventure... maybe.

Friday, July 2, 2010

Design Wall

First, it is Friday and we did go out to lunch, but it wasn't any place really special.  I got to go out to lunch yesterday with some friends, so today I told my husband that we could go to IHop so he could have breakfast. That's not to say that I don't enjoy having New York Cheesecake pancakes.  We went to the music shop that he enjoys shopping in that is right next door to JoAnn's - so we both got to see what special deals we could find for the 4th of July weekend.  I bought a new rotary cutter, name brand was Claus.  It has a titanium blade - will have to see how it holds up to the others.  Best part was it was 50% off.  I was also able to use my 40% off coupon on another item.

I tried to post a response to the forum on TheQuiltShow.com on the subject of Design Walls.  In my attempt, I found I could not find how to put an image in the New Forum, so that is when I decided to post it here.  There are lots of ways to create a design wall.  It can be as simple as pinning your pieces to curtains or putting a flannel back table cloth on the wall.  If it works, that is all that matters.  I have limited wall space in my house.  I have a good size shop out in my garage for my quilting frame and commercial embroidery machine, but there is no space for a design wall out there - besides I don't do any sewing out there.  In the house my sewing room is sufficient for my sewing machines and ironing board and cutting table, but not alot of extra room... and no space for a design wall.  The hallway was the only available wall.  It is a very bright hallway because there is a skylight above it, and I can stand back in one of the two doorways to get a perspective view of whatever might be on the board.

When I told my husband I needed a design wall he decided to use corrugated plastic board that is used for signs.  It comes in 4 x 8 foot sheets, and is typically white.  I covered the board with flannel using a spray adhesive, which included the edges that fold over to the backside.  He attached a 7' piece of molding that created a lip to hold onto the two screws on the wall.  He attached the molding with two screws from the front side and reinforced it with a couple staples in between.  I lifted the board off the two screws on the wall to take these pictures.  If I ever didn't want it on the wall, I could take it down and slip it under a bed.


A few months ago I needed a larger area for a quilt I was working on.   My design wall is mounted so that the bottom is about 24" off the floor.  I created a hinged board that folded was 24" by 48" and it made my wall expand to 6' x 8'.  I slipped the opened hinged board under the bottom edge of the one that was hanging.

I have one at our cabin in Colorado.  My sewing area is in the loft and there is no wall to hang a design wall so we took a 4 x 8 sheet and divided it into three pieces and put two hinges on it so that it can stand on the floor pretty stable.  It folds up and stores behind my sewing table very nicely. I have also made a couple different sizes that I can take with me to quilt meetings.  One of them I even covered the back so it would look nice sitting on display on a table.

The cats like to get in the middle of whatever might be new in their space.

If you have any questions about my design wall, I would be happy to try my best to clarify.