Saturday, December 28, 2013

Folded Log Cabin


Back in the spring I went to a quilt retreat.  I had brought lots of fabric with me to make sure I didn't run out of things to do.  I had seen the technique done to make a "folded log cabin" block and some of the extra fabric I had brought with me was intended for an attempt to create a block or two.  It wasn't long before I had three blocks done and I had no finished project in mind.  Just that morning we drove into town to the local quilt shop and I bought a piece of fabric that I just liked because it was so colorful... I had totally forgotten anything about the fabric I had brought along.  Well now it is early evening and I have three blocks that I put up on the design wall and ask opinions on.  They had me turning and rearranging, then someone suggested putting them against a black background, and it just happened that someone there had a piece of black so I could audition it.  It was a Wow... sure made those blocks pop.  Then another Wow moment quickly followed... I remembered the fabric I had just bought a piece of that morning.  It had several of the same colors.  It was like I had those 3 blocks with me when I bought it.

I had to wait until I got home to put it all together, but my wall hanging was coming together... one step at a time.  I had not used rick rack in ages for anything.  One of the ladies at the retreat was using mini rick rack for her stems in one of her projects, which put the thought in my head when I was trying to figure out how I was going to finish the edges of these blocks.  Once I determined the positioning for the blocks I thought about the rick rack and used my pinking blade in a rotary cutter to trim the edges of the blocks.  The rick rack and the pinked edge were a natural.  I thought the wall hanging needed some other accent, so I looked for the beaded trim at JoAnn's.

It has been a while, but I finally picked this project back up so I could quilt it and call it finished.  I stitched the binding on yesterday. The plan right now is... it is mine.  Not intended for a gift.... least not yet.  Thought a closer look might be helpful. 

It took a while to get this one done, even though it really was a pretty easy project... it is just one that didn't have a priority set, so it just sat there waiting to be finished.  Sometimes my own quilts are the last ones to get quilted.

Here's hoping you are all ready to step into the new year and that your year ahead will be blessed.


Sunday, December 22, 2013

Almost Christmas

It has been a very long time since I have created a new post.  When I remember that it has been a while, I think I should take the time, but then I get busy doing something and blogging time slips away.  I'm thinking I might try to see if anyone is still interested in what is going on in my little corner of the world.  Even a one-word comment is welcome.... might inspire me to do more posting.

Right now I don't have anything exciting to post about, but I thought I would start with a tip for the quilters out there.  I don't know how many have bought a panel to make a fabric book for your grandchild.  One of the things you have to keep track of in the process is the sequence of the pages.  The numbers are labeled on the panel, but those numbers get hidden in a seam or cut off before you are finished.  Here is where a Smartphone can come to the rescue.  Snap a shot of the sequence before those numbers are lost.  Now you have a little bit of insurance that you can get the final book pages in the right order. Smartphones can do much more than talking and texting. 

Christmas is just around the corner.  Hope everyone is ready.  Merry Christmas to all.

Sunday, July 28, 2013

Moon Flower Plant

After I started working on my patio this spring I have had a few friends give me plants which is a good thing... because they have extras from their garden to share, must mean they are good for this area.... right?  I'm new to gardening in Texas, so any help I can get is great.  Way back when, I have had many a garden, and mostly very big gardens.  Gardening in Texas is a whole new arena... I have to learn all over again.  The soil here is mostly sand, and the ants, grasshoppers and deer are really prolific and there is a spring garden as well as a fall garden, and I have been told that if you know what you are doing, you can plant almost any time here.  Now all I have to do is learn what works here.  I tried my hand at it the first year we were here, on a very small scale, but it was a disaster... which caused me to hang up my hoe for a very long time.  I have planted some bushes and flowers with pretty good success lately, but I have decided to take it up a notch... or two, and do a real garden and see what happens.

Back to my friends... one in particular has a very green thumb.  A few weeks ago she brought me a bunch of different plants that were from her garden.  She thought I might enjoy some new plants. One of them was a Moon Flower.  For the first couple of weeks I didn't think it was going to make it, but it came around and started to show new life.  This was my Moon Flower plant last week.

I have been keeping an eye on it through the week, and really noticed it yesterday.

This morning at 7a.m. I took this picture.  The top part that is the actual blossom, above the green, is at least 4" maybe 5" long.  This is my very first Moon Flower, so I'm learning as I go, but from what I have been reading, this is a vine type plant, and will grow several feet in one season.  It is remarkable to see how it has changed in just one week, but I have not seen any indication that this one wants to start climbing.  I am sure I will see new characteristics in the upcoming weeks.

This next photo was taken at 1 this afternoon.  The plant is drooping because of the hot sun, but I can see that I will have to be keeping close tabs on this blossom as the evening approaches.  The blossoms of the Moon Flower only last one day... that is it will open in the evening, then be done next day by midday... I'm thinking that will be more like mid-morning.

Sunday, July 21, 2013


Our backyard has taken on such a new look, or maybe it's a persona.  It looks so different than it did not so very long ago.  With the new look, it has taken on a new personality.  Before I began my patio project back at the beginning of May... the backyard had nothing that would make you want to sit out there... at least I didn't think so... but it has been there all along... I was just looking at it with a different attitude.  Now every time I go out there, I see something else I want to do to make it even more appealing.


It's not uncommon to see cardinals at my bird feeder, and there are several hummingbirds that have become regular visitors.  It is quite a peaceful little space that I have discovered. 

My attempts at gardening here in Texas have not always been very productive.  I have had a few tomatoes and peppers that I planted in the flower bed in front of the deck, but I want to have a real garden one of these days... and I'm hoping to do that real soon, behind the house where there is lots of room.  We have been working at creating a raised bed for my first fall garden, which will also be my first raised bed garden.  Hopefully I will get it filled with soil this week.  The area where we live is considered the sand hills... so all the soil to go in the raised beds will have to be brought in.


Tuesday, July 16, 2013

Our patio seems to change, almost every day.  Sometimes it is because I have added or changed something, but more often it is the growth of what I have planted or new birds at the feeders.  I am really pleased with my decision to include a bird feeder and bird bath to go along with the Hummingbird feeder. 
This table was a unique addition.  The top is plexiglass, and beneath the plexiglass the colors are created using natural sand from the yard and some bought at JoAnn's.  We later added some metal stars around the base of the table.  Really neat to see how many uses we can find for these handy black tubs.

This section of fence was added to give the patio a more defined look.  It also is a backdrop for some vines to climb on.  This is to the left as you step onto the patio from the deck.  I got a late start in regard to optimum planting time for my flower garden, but all seems to be doing pretty good.  Still waiting for the Morning Glories to produce any blooms.  One of these mornings I may be surprised when I go out there.


Here is a closer look at how my herb garden is doing.  The basil is the big one in the middle.  The bench in the background doubles as a table.  I really enjoy this bench. The back rotates up to make half of a picnic table.  We have a second bench like this on the deck so with the two together we would have a full size picnic table.  Quite often I find one or two of the cats sleeping under the bench.  I think it is a cool place for them to lounge, especially later in the day when the big oak tree provides even more shade.


Now I have a question... has anyone seen a moth that looks like this?  We found this guy on the wall just to the right of our back door.  He was there yesterday, and he is still there today.  He is pretty big... maybe 2" across at its widest.  Sure isn't anything we have seen before.  We are just leaving him alone.  He doesn't seem to be bothering anything. 

Thursday, July 11, 2013

Progress on the patio

I started off with the idea of having a red block patio, but early on my best critic advised me that he thought it would be cool if I used some of the blocks from the clothesline pad to make the patio look like a quilt block.
This was still very early in the patio project, but you can see where I switched blocks from the clothesline pad to the patio, so I now have two quilt blocks instead of a patio and clothesline pad.  The black tubs are not in place yet... this shows their size before I sunk them down a bit.

The blocks are not "grouted" at this point.  I needed to get them all in place and be sure that I wouldn't need to move any more than I already had.  When I was ready, I used a material called Poly Sand... I have heard it was advertised on TV, but I came by the idea of using it by word of mouth from a friend.  The Poly Sand pretty much seals the cracks so weeds can't grow up in between.  So far I'm thinking that was a very good choice.

The patio here is starting to really take shape.  I have a planted a few plants and bought some mulch in, and added some new color.  Those petunias just keep on keepn' on.  I bought a Jasmine plant that needed to have a post to climb on, the black tubs are submerged about 6 inches... these tubs have had holes drilled around the base and bottom to allow for drainage.  These will have some herb plants... not sure, they could already be there in this picture... just can't see them at this point.  Texas is a focal point to the left.  To the right you can see some round stones that used to be the "patio".  Actually they were what I stepped onto when I went down the back steps before I decided I needed a real "patio".  Moving them over to the side extended that edge. 
I will post again soon.

Sunday, July 7, 2013

Walkway is done


Quilting has not been high on my priority list… It isn’t that quilting has lost its importance, it is just that my focus has been averted for a while.  Walkway, patio and gardening are in the forefront at this time.  Walkway is done, patio is looking really good, and garden is on the horizon.

In a previous post I showed the sart of my walkway out front.  I have finished that walkway.  It turned out pretty nice.  I have had several Esperanzas in the flowerbed  for a couple years already.  After I finished the walkway I decided I would try putting some other plants in between.  I put in some tomato and banana pepper plants that produced lots of good eating.  I also planted some basil and a few other miscellaneous plants.
Everything did really well except the summer squash.  It seems that my soil is lacking something the squash needs, but by the time I figured this out, it was too late to fix it for this season of squash… but I will know next time. Right now the Esperanzas are up higher than the railing on the deck… and that is after being cut back in January, almost to the ground. I have to tell you how much I really, really like Esperanzas. 

I talked my husband into buying a pallet of patio blocks so I could start our patio out back.  I got over the thought of making my own patio blocks after my experience with the walkway out front.  Not that it was a bad idea, just that it is a lot of work no matter how you look at it.  We had the pallet delivered on April 28th.  Sunday was an odd delivery day, but that was when the truck was coming down to our neighborhood.  I chose red patio blocks as a contrast to the gray blocks that I had previously used for the clothesline pad.  I had kind of leveled the ground when I put the blocks down for the clothesline, but I didn’t get fancy.  I didn’t put anything in between to stop weeds from growing up, so it was a continuous task to keep the clothesline pad free of weeds.

It was a challenge to convince my husband that it was a worthwhile project to consider a patio out back.  His comment was that there is nothing pretty about the back yard, why would you want a patio out there.  I had thought of a few different areas to put the patio, but the one that made the most sense was just off the steps from the deck.  Turns out that was a good choice.

I have been continually working at this patio for more than two months now, and it always seems like there is something new I come up with to do… but I’m really enjoying this patio.

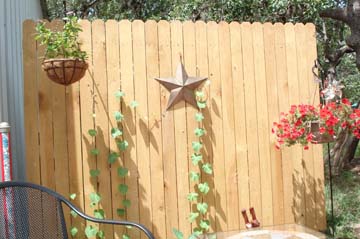
I'm going to limit the length my post at this point.  I have lots of pictures to share, but I need to keep this within reason.  I will be posting more.  Just thought this was a good place to start up posting again.  The key element here is the before picture above of the patio area.  I enjoy looking back at it now and then to remind myself how far I have come.
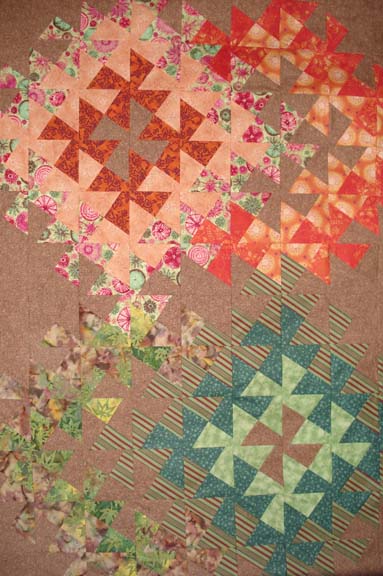
Saturday, March 9, 2013

Do you know what a mug rug is?

I wasn't sure that I could get my latest project done within the timeline assigned.  I signed up for a "mug rug swap" and my partner... that is the one I am supposed to send my "mug rugs" to, lives in Australia.  First of all, this is the first real swap that I have participated in.  After I received the two patterns, I wasn't sure I would do justice to the project... so I procrastinated getting started.  Using Steam a Seam is not my favorite way to do applique, but it appears that it would not be practical to do it any other way... so I forged ahead.  These are the fronts and backs of my resulting projects.  The deadline to be mailed is Monday... so God willing and the creek don't rise... I will be at the P.O. on Monday morning. 
By the way... a mug rug is for your coffee mug, or teacup, and enough space for a treat on the side.  These little rugs are 9" wide.

Last week I completed another project that turned out to be quite a little challenge.  I was given baby crib bumpers... I forgot to take a picture before I started the dis-assembly.  Of course Shorty found the stack of batting I had removed and started massaging her new bed. Anyhow, since it has been determined that crib bumpers are no longer safe... although how many people today slept in a crib with bumpers?  I would say most.  Wall hangings were requested and I puzzled on the task ahead for a bit, then decided that every seam had to be ripped out so that I would have every block individual to start considering their new placement.  My husband made the suggestion that I should move away from a "squared up look"... so I ventured out and came up with an "S" curve.  The end result was pretty cool.  Outside of the batting, almost all of the crib bumper material was used. The lady that had me do this for her new grand-daughter was very pleased.  Another project that will remain unique... It could not be repeated... because once is enough.

Last weekend there was a plant sale at the Alternative Education Center in town.  I have not been real successful with plants here in the sand dunes... we are not really in the sand dunes, but I really have to learn how to garden in Texas.  It is a challenge.  What is an even bigger challenge than the sand is the cutter ants that can strip your plants clean overnight.  I'm going to give it another shot though.  I have been preparing my little strip in front of the deck... my "sidewalk" is about half done... and looking pretty good.  I have not filled the cracks yet, but I have this stuff called poly sand that is supposed to do a real good job.  In this clip is the Bougainvillaea I purchased last week and an ornamental garlic.  In the middle is the Esperanza that has been cut back and started to show green leaves already.  I planted that a couple years ago.  My Esperanzas do really well... the ants don't seem to bother with them.  I have several, and they are beautiful.  I'm anxious to see if I can keep something new growing this year.

Thursday, February 7, 2013

Trail Riders

February is already proving to be a very busy month.  The first Saturday was Mid-Tex Symphony in New Braunfels.  The symphony's performance was outstanding. The theme was Superbows, and all the violinists were awesome.  Now I never took a music appreciation class, so for sure I may not have the right terminology... but I do know the music was wonderful.  We have season tickets and have enjoyed every performance with two of our very best friends.

Back up a couple weeks, we were invited to join in a group to make tamales.  Our leader of the pack is a veteran tamale maker... he does it every year in remembrance of his mom.  He has the technique down pat, and he tries to pass some of his knowledge along to us novice tamale makers.  Even though I will never attempt this by myself... there is so much more to it than the average person could possibly imagine.  We all had a wonderful time making tamales... and we all had plenty to take home with us.

One evening not long ago, I went out to call the cats in for their evening treat.  I looked up to see the moon through the big oak tree in front of the deck.  I went in to tell my husband that he needed to come look at the moon.  He went back in to get his camera once he saw it.  The fog gave it such a different look from a normal full moon.  At least I think it was a full moon...  Anyhow, I thought this was a really cool picture.


Now on to the highlight of the day.  We have a walking path that we drive to, and on our way over there this morning we saw lots of horse trailers at the main intersection down the road from our house.  It is Rodeo time and the week before Rodeo the Trail Riders start their trail ride that ends up at the Rodeo.  It passes through our town on Thursday every year... today.

There are lots of riders... the traffic is narrowed to one lane to pass by the trail drive safely.  Although this morning was a bit overcast, and there was a mist in the air, it was actually a pretty mild day compared to some of the inclement weather that sometimes is their lot.  February is pretty unpredictable.  Today even with the misting rain, some of the riders were in short sleeves.


Sunday, January 27, 2013

Kitty approved

It has been a productive week.  I started a Twister quilt which was about half done when Shorty decided she wanted to test it out.  I have a cutting table temporarily set up in front of the fireplace and Shorty took up temporary residence on the WIP.  Shorty is my official tester... any new piece of fabric laid down in an accessible spot is fair game.  She likes to move around and test out new resting places, so it is always good to provide new test sites for her.

A couple days ago I finished the piecing on the Twister and it is now ready to be neatly folded and put into the "ready to be quilted" stack.  Now if I could only find a home for this lap size quilt, it might stay at the top of the stack.  This was a fun quilt to make.  I learned from the test quilt I worked on a couple weeks ago (posted previously below), but my husband still thinks there is not enough contrast... some pinwheels are less visible than others... but that is what it's all about... isn't it?  I actually bought a pattern for the placement of the blocks to get the desired appearance.  The pattern example used black as the background material... but I really, really do not like working with black.  My eyes just have such a hard time adjusting and seeing what I am working on.  Outside of the background, all of the other fabrics are from my stash.  I did not have enough of anything that would work for the background, so I bought the brown.  I did not have any fabric samples with me to judge the contrast, so I think it turned out pretty good for guesswork.

A couple weeks ago we took the leap into the latest in coffee makers....  at least it was a leap for us.  Both my husband and I didn't think we needed one of those Keurig machines.  We had our coffee making technique all figured out.  Well my husband saw an advertisement for a K-cup which allows you to make a cup of coffee using your own coffee instead of having to buy the pre-packaged cups... which does not mean that we won't use the pre-packaged cups, but we have the choice.  Yesterday I removed our old green coffee maker to a pantry shelf.  We had left it on the counter... just in case the Keurig didn't work as we had anticipated.  In front of the old green machine is the 3 boxes of samples for the Keurig.  I found a deal with 105 different coffees and teas... I have a list handy so that we can record our opinions to help us decide which ones are worth buying again, and those that are not to our liking.  We are really loving this new experience in coffee.  We bought a big box of Newman's Special Blend at Sam's, and that is already more than half gone.

I have been wanting to make a patio out in the back yard.  I had heard about a form to make your own patio blocks and bought the form a few months ago already.  Earlier this week I decided it would be good to do a test in the front yard in front of the access for the outdoor faucet.  This is two castings of the form, which took two 80# bags of ready mixed concrete.  My husband even bought a new wheelbarrow to help make the job a little easier.  I like it so much, I think I am going to expand my new pathway to go across the whole front of the deck... and if I get it done, I will be sure to post a picture.  We bought some more bags of concrete mix yesterday... so my work is waiting for another good day to work outside.

 LBNL - Last but not least, I thought I would try my hand at English Paper Piecing.  Last week I bought the book "Hexa Go-Go".  It is a very good book with a few really nice projects to get you started.  Now as most people already know, EPP is a hand sewn technique. This sew book is the first project in the book.  The Hexies are of course done by hand, but the rest of this project is sewn on the machine.  This is a place to keep your handwork tools together while you are working on your hexies for the project at hand. This sewbook is 4 1/2" tall which makes it a quite handy size.  Of couse I still have yet to put it into use, but I am sure that it will work quite nicely.

The inside has pockets, and felt is layered to hold your pins and needles.  I used one of my antique buttons for the closure... the fabric is all from my stash, including the felt.  Now I will have to see what new project I can start to add to my UFOs.

Hope your week ahead is a good one.

Tuesday, January 15, 2013

Roll Top Desk... where is it?

I have a couple friends who have been making these things that they are calling a "snood".  I tried to find directions for how to make a snood, and what I found did not look like the snoods that my friends had.  So I asked one of my friends how hers was made and she gave me the stitch count and hook size and off I went looking in my stash for yarn that I could use as practice to see if I could get mine to turn out OK.  I had some Fun Fur left from a couple years ago on a different scarf fad.  I didn't have enough of one color, so I just grabbed two totally different colors.  I actually liked how it turned out.  Now I found instructions for similar scarves/hoods, but they were calling them cowl neck scarves.  A snood was described as something you make to cover up your hair... usually long hair.  I think it is a mobius scarf that can be used as a hoody...  A scarf with a twist.


 In case it slipped by your attention... I have a couple feline friends that live at my house... four to be exact.  Often times my socks have kitties on them.


I was browsing through my newsletter from Superior Threads today and they had a tip from a customer that told how she kept her bobbins with the proper thread.  I won't try to describe her little tutorial, but I thought this was a pretty neat idea.  You can go check out her instructions by clicking on this link...  Maria Elkins' tutorial .  It uses a fat straw, and when I first tried to do one, I was having an issue understanding just how it was supposed to work.  Once I went back to look at her pictures and instructions again, it became clear that I had not read it correctly the first time. 

Back several years ago I saved up my money and bought myself a roll top desk.  I had it before we moved to Texas... but no one in Texas was aware of this desk that has been sitting in our computer room, in the same spot, since we moved here.  The initial reason was that I put a lamp on the desktop that was too tall to close the top.  Then of course it doesn't take long to load up a desktop so that it becomes difficult to find a clear spot.  A couple weeks ago I tried to talk my husband into helping me move the desk.  I wanted to turn it so that someone looking in the room from the hall would not see the clutter on my desk.  He suggested we think on it for a week first.  I then started doing some organizing and clearing out of the clutter, and before I knew it, the  only obstacle in the way of closing the roll top desk... was the tall lamp.  Changed the lamp, and I found my beautiful roll top desk.  I mentioned it to a couple friends, and they had no clue where in my house I was hiding my roll top desk.


It is sometimes a couple weeks in between getting a quilt done.  I don't remember when my friend brought this one to me to be quilted, but I finished the quilting this afternoon.  It is always a good day when I finish a quilt.  Now this is only one corner, but it is enough to help me recall when someone asks... remember that quilt you did for my last year... when you do lots of quilts for other people, they kind of all run together.  
Finally... another pair of socks.  It was so cold this morning that when we went into town to go to breakfast... I surely had my socks on... and I also wore a scarf and gloves and my leather fully lined jacket.  Today I actually think it is colder here than it is up north.  Of course it never stays cold for very long here... but it seems extra cold because we aren't used to it anymore.  Now our kitties are Texas kitties and they are choosing to stay inside... so that confirms it... it is cold outside.

.

Friday, January 4, 2013

Socks and Shorty and Quilts

Fridays are typical days for a trip into San Antonio.  Quite often one of our stops is at JoAnn's.  You never know what you  might find on sale, or how many coupons you can use.  I'm always on the lookout for a new gadget, or maybe some yarn.  There are lots of options to help organize my sewing space... and my most favorite item to find is a new pair of socks..  There are always lots of  socks to choose from... usually specific to the closest holiday.  They didn't have any Christmas ones left today, but I bought a couple with hearts on them.  This pair, bought a few weeks ago, isn't really holiday specific... I just liked the colors... I guess these aren't that colorful, but I liked the design.  Anyone who is around me very much is aware that they can count on my socks being quite colorful or crazy... or both.

I wasn't looking to take any pictures tonight, but I glanced over and found Shorty in a new spot.  The sewing box/stand has not really found a new permanent spot in our newly changed around living room, but Shorty found it inviting.  She is always looking for new places to claim as her spot, and this one was quite unique.  The handle around her middle is stationery on the stand, and she just slid in and made herself comfortable.


This photo op with Shorty prompted me to go out on the porch and take the picture I thought I should have taken earlier today... our esperanza still has blossoms on it... and it is January.  I don't remember blossoms hanging on quite this long before.  Even the seed pods have not started to dry yet.


 Recently I bought a new quilting ruler... or do you call it a tool.  Anyhow it is intended to make a quilt called a Twister.  I have a friend who recently finished a twister table topper and I thought it looked like a fun quilt to make.  I wanted to start off and make a practice piece, so I grabbed a few pieces of fabric and started cutting. I sewed them together in a way I thought might work.  I knew what I was looking for... a pinwheel.  Well, when it was done I showed it to my husband and he said it was really hard to pick out the pinwheels.  I have to agree now that I back up and look at it from a different perspective.  The best part of making a practice piece is you can learn what not to do when you start your "real" quilt.

Last, but certainly not least... this is the quilt that has been waiting to be quilted for 3 years.  I have been reluctant to put it on the frame because I put so much time in all the piecing and its intricate detail, that it intimidates me.  I have not been able to decide how I will quilt it.  I determined the problem... I would not think about it if it was folded away in a drawer... out of sight.   I have now taken it out and hung it over my sewing room door.  I put a folded batting strip across the top of the door to protect the quilt, but it is in my face every day now... so I am confident that I will get it done... in the near future.  It is quite an awesome quilt. Once I get the quilting done, I may consider putting prairie points on with the binding.  It may be too much, but I have that to think about for a while.